 Go to Makerobos
Integrate backend with Frontman to get and post real-time data by simply using the JSON API feature.
JSON API menu
JavaScript Object Notation (JSON) API makes it easy to get and post user data in real-time, and on the other hand, it also improves the data parsing factors for machines. It’s a user-friendly way to read and write data to and from company databases on run time.
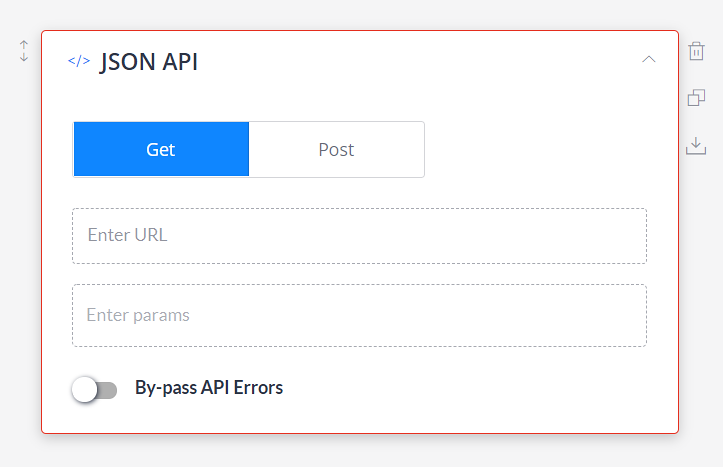
JSON API card Functions:
- Activate/deactivate: JSON card is activated by default. Click on the button to deactivate it.
- Get: To get data from backend or CRM.
- Post: To post data into backend or CRM.
- Enter URL: In this section, paste the JSON API URL from where you want to extract data.
- Enter Parameters (Optional): You can pick one or multiple attributes from the provided list, to send along with the API. In case you don’t want to set parameters, then keep this slot empty.
- By-pass API Errors: With this feature, you can choose to run the conversational flow even if there is any kind of API error. If you turn off this feature, then the conversational flow will not proceed ahead (in case of API errors).
Here are a few JSON codes that you can use:
1. For Sending a simple message to a new visitor:
Here “template_type” can only contain “message”, that you want to send whenever a visitor starts a conversation with the Frontman. In the next line of code, you need to define the “message” that you want to send to the visitor. As per the below code, visitors will see: Hi, greetings from Makerobos.
{
  "entries":[
    {
      "template_type":"message",
      "message":"Hi, greetings from Makerobos"
    }
  ]
}
Note: The maximum length of a message can be 500 characters.
2. Sending messages with buttons:
Use this code if you want to send a message with the buttons to take input from the user as a response.
- “template_type” can contain “message”.
- In the “message” section, define a message which you want to display above buttons.
- Here “buttons” can only contain “type”: “url”.
  {
              "entries": [
                  {
                    "template_type": "message",
                    "message": "click the below button to view the demo.",
                    "buttons": [
                      {
                        "type": "url",
                        "url": "https://www.makerobos.com",
                        "webview_height": "full",
                        "title": "Preview"
                      },
                      {
                        "type": "url",
                        "url": "https://www.makerobos.com",
                        "webview_height": "small",
                        "title": "Preview"
                      }
                    ]
                  }
               ]
            }
Note: Max 3 buttons are allowed per card.
3. Sending carousels:
If you want to send users a carousel (image slideshow), then use this code. As stated below:
- template_type: “carousel” means that only a carousel can be used to send the data.
- “shadow” is used to highlight the carousel slide if the shadow value is True. And, if shadow value is False then it will not be highlighted.
- “slides”, here you have to write the “title”, “subtitle”, and provide the “image-url” of the carousel.
- “buttons” here you have to define the button “type”, “url”, “webview_height” and “title”.
- “type” is defined as “url”
- “url” provide the website or webpage url that you want to link with carousel.
- “webview_height”, you can change the height of carousel by using “new”, “medium”, “full”, “small”.
- “title” write the text that you want to display on the button.
 "entries": [
        {
          "template_type": "carousel",
          "shadow": True,
          "slides": [
              {
                "title": "Makerobos",
                "subtitle": "Established in 2018",
                "image_url": "https://www.makerobos.com/assets/images/dashboardScreens/screen_01.jpg",
                "buttons": [
                    {
                      "type": "url",
                      "url": "https://www.makerobos.com",
                      "webview_height": "new",
                      "title": "Preview"
                    },
                    {
                      "type": "url",
                      "url": "https://www.makerobos.com",
                      "webview_height": "new",
                      "title": "Preview"
                    }
                  ]
              },
              {
                "title": "some title",
                "subtitle": "some description",
                "image_url": "https://www.makerobos.com/assets/images/dashboardScreens/screen_01.jpg"
              }
          ]
         }
        ]
    }
Note: Maximum nine slides are allowed in a carousel. And, a maximum of three buttons are allowed in each slide.
4. Sending Images, Videos, Audios:
This code can be used when you want to send the response as images, videos, or audios. Then
- “template_type” can contain audio, video, and image.
- “url”, here provide the url of the media that you want to insert.
   "entries": [
        {
          "template_type": "video",
          "url": "https://youtu.be/vv5Or9sC9TI",
          "button": {
            "type": "url",
            "url": "https://digital.makerobos.com",
            "webview_height": "small",
            "title": "Preview"
5. Setting attribute:
This is used to set the attribute. In the example below, “temp_type” is set to “set_attr”, and the attribute is defined by “first_name” and its corresponding value is set into the “value” key (“John”). You can access it by using {{first_name}} attribute to check whether the value is stored or not.
{
      "entries": [
        {
          "template_type": "set_attr",
          "attributes": [
            {
            "attribute": "first_name",
            "value": "John"
            },
            {
            "attribute": "subscribed_email",
            "value": "john@mail.com"
            }
          ]
        }
      ]
    }
Here is the Github link of the above codes
Use Cases of JSON API in Frontman:
- To generate dynamic content.
- To re-enter a flow.
- To get and set user attributes.
- Redirect visitors from one block to another.
- Play targeted or promotional videos within the chat window.
- Integrate your API with the chatbot, and post content directly from your resources.
- To start a limited time offer and restrict the visitors’ interaction after a specific time.
The JSON API integration is only available in business and enterprise plans
Makerobos Help Center
